
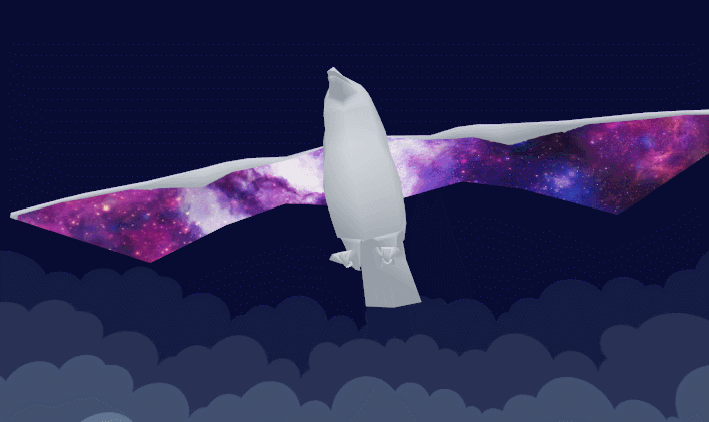
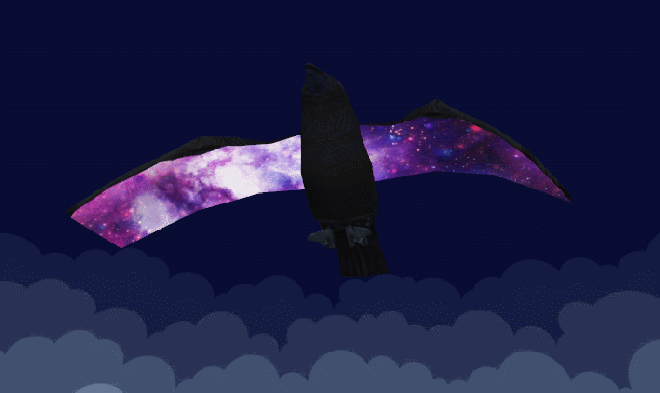
Hey y’all! I was incredibly inspired by this piece of art that Caludia Rinofer created, and I wanted to try and make it as a shader.
Concept: Birds carry the sky with them for a couple of hours pic.twitter.com/fldCohD76j
— Claudia Rinofner (@polterink) February 1, 2018
The result was the bird you see from the header image! And, of course, I just had to make a tutorial out of it too, to show y’all how I used texture masks and other fun shader tricks to create the effect.
If you enjoy this post, please consider following and supporting Claudia, who inspired it, and checking out the free Unity assets I used for the bird and background:
Living Birds (raven 3D model)
Farland Skies (skybox)
You can find the final code for this tutorial here.
Now, on with the tutorial!
Color Mask
Let’s look at how to use a color mask to replace the bird’s original texture with the galaxy texture.
Setup
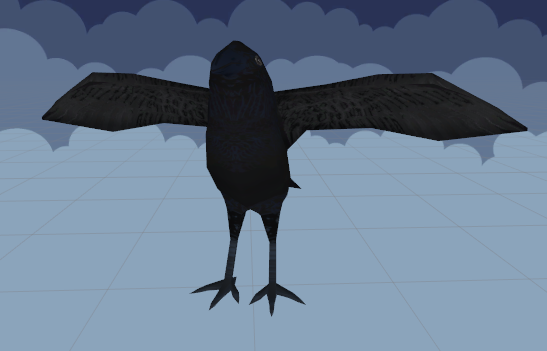
Firstly, you’ll need the regular texture that covers most of the bird (or whatever object you’re using). For example, I used the default texture for the raven from the Living Birds asset pack.

Now, we need to create a texture in which the area we want to replace with a different texture is a solid color. Our shader is going to read this mask texture, and wherever it sees a pixel with our mask color, replace it with the replacement texture. In my case, I used an image editing program to color over the underside of the wings using the original raven texture as a reference. My mask color is red.

Finally, you’ll want a replacement texture. I used a cool galaxy texture, as inspired by Claudia’s art.

Now, we’re ready to start our shader. Set up your Properties with the original texture, the replacement texture, and the mask texture and mask color.
Properties
{
  _MainTex("Texture", 2D) = "white" {}
  _MaskTex("Mask Texture", 2D) = "white" {}
  _MaskColor("Mask Color", Color) = (1,1,1,1)
  _MaskReplace("Mask Replace Texture", 2D) = "white" {}
}
Basic Lighting & Texture
Now, before getting into the color mask stuff, let’s set up our fragment shader to do some basic Lambertian lighting and sample our main texture. After implementing the basic shader properly, you should just see the regular ole’ raven with its main texture and lighting.
float4 frag(vertexOutput input) : COLOR
{
  // lighting
  float3 lightDir = normalize(_WorldSpaceLightPos0.xyz);
  float lightDot = saturate(dot(input.normal, lightDir));
  float3 lighting = lightDot * _LightColor0.rgb;
  lighting += ShadeSH9(half4(input.normal,1)); // ambient light

  // albedo
  float4 albedo = tex2D(_MainTex, input.texCoord.xy);

  // ~~PUT MASKING CODE HERE~~

  float3 rgb = albedo.rgb * lighting;
  return float4(rgb, 1.0);
}
Using the Color Mask
Now, let’s put that color mask to work! Firstly, we need to sample our mask texture to check if the pixel we’re looking at is equal to our mask color:
float isMask = tex2D(_MaskTex, input.texCoord.xy) == _MaskColor;
Because we made this a conditional statement, the value of isMask will either be 1 or 0.
Before moving on to replacing the mask color with the galaxy texture, let’s just define a white replacement color for now to make sure our mask works:
float4 mask = float4(1,1,1,1);
Now, we need to modify our albedo color based on this mask sample. Because isMask will either be 1 or 0, it’ll cancel out either albedo or mask depending on its value! And while we’re at it, let’s also cancel out the lighting for the masked area.
albedo = (1-isMask)*albedo + isMask*mask;
lighting = (1-isMask)*lighting + isMask*float4(1,1,1,1);
Your masked area should now be an unlit white color, like the following!

Using the Replacement Texture
Once you’ve got your mask working, using the replacement texture is easy. Just sample your replacement texture and use that instead of white for the value of mask. The whole fragment shader then looks like this:
float4 frag(vertexOutput input) : COLOR
{
  // lighting
  float3 lightDir = normalize(_WorldSpaceLightPos0.xyz);
  float lightDot = saturate(dot(input.normal, lightDir));
  float3 lighting = lightDot * _LightColor0.rgb;
  lighting += ShadeSH9(half4(input.normal,1)); // ambient lighting

  // albedo
  float4 albedo = tex2D(_MainTex, input.texCoord.xy);

  // mask
  float isMask = tex2D(_MaskTex, input.texCoord.xy) == _MaskColor;
  // sample replacement texture
  float4 mask = tex2D(_MaskReplace, input.texCoord.xy);

  albedo = (1-isMask)*albedo + isMask*mask;
  lighting = (1-isMask)*lighting + isMask*float4(1,1,1,1);

  // final
  float3 rgb = albedo.rgb * lighting;
  return float4(rgb, 1.0);
}
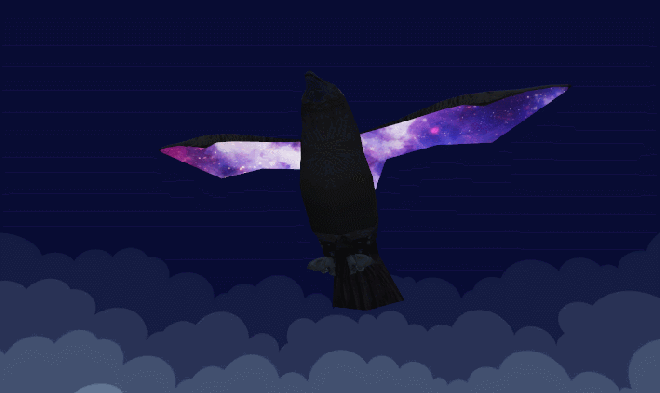
Your birdie should now display the galaxy texture wherever you put red on the mask texture! Congrats, you’ve finished the color mask portion of this tutorial.

Sampling in Screen Space
Now, you’ll notice that the galaxy texture in the gif above moves with the bird. This is because this texture is being sampled in the object space texture coordinates. It’ll conform to the shape of the bird, just like the bird’s regular texture.
However, to make it look a bit more otherworldly, like the bird’s wings show a portal to the galaxy, we’ll need to sample the texture using screen space coordinates. This will give that detached effect, much like how the textures in the show Chowder seem to be static and ‘behind’ the characters instead of sticking to them.
We’ll need a couple new pieces of information: the screen size and, optionally, an arbitrary scale factor set in Properties.
Here’s the Property for our tuned scale:
_MaskScale("Mask Scale", vector) = (1,1,1,1)
Unity provides a function to grab the current screen space coordinates called ComputeScreenPos().
These coordinates are the exact pixel location on the screen, which is dependent on the screen size, so we need to divide by the screen size (provided in _ScreenParams.xy by Unity) in order to get a value between 0 to 1 to sample our replacement texture with.
// screen-space coordinates
float2 screenPos = ComputeScreenPos(input.pos).xy / _ScreenParams.xy;
You can multiply this sample location by an arbitrary MaskScale if you want to zoom in or out of your texture a little bit.
Finally, we can sample our texture based on this position instead of our regular texture coordinates.
// screen-space coordinates
float2 screenPos = ComputeScreenPos(input.pos).xy / _ScreenParams.xy;
// optional MaskScale
float2 maskPos = screenPos * _MaskScale.xy;
// sample replacement texture
float4 mask = tex2D(_MaskReplace, maskPos);
Now, you should see your texture displaying without regard for the shape of the wings, as if the wings are a portal to the galaxy!
Scrolling UVs
Finally, let’s look at how to make it look like the galaxy is moving behind the bird’s wings. You could accomplish this by just moving the bird model around, but why not learn yet another shader technique while we’re at it??
To do this, we need to learn how to scroll the UVs. This means we’re changing the position that we’re sampling on our galaxy texture over time.
Make sure that your replacement texture’s import setting for Wrap Mode is set to Repeat. This will allow our sampling to loop!
We also need a new Property to tune the speed of the scrolling:
_Speed("Mask Texture Speed", float) = 1.0
// scroll sample position
maskPos += _Time * _Speed;
// sample galaxy texture
float4 mask = tex2D(_MaskReplace, maskPos);
And there we go! With some tuning, your galaxy should be moving behind the bird’s wings!
Fin
We looked at a bunch of cool effects in this shader, including color masking, drawing in screen-space coordinates, and UV scrolling! Congrats on making it through.
You can find the final code for this special effect shader here. It’s under a non-commercial, open-source license 😀
Consider supporting me on Patreon! Patrons got to read this tutorial weeks before it went public, and $5+ Patrons get to vote on tutorial topics 🙂
If y’all have any questions about writing shaders in Unity, I’m happy to share as much as I know. I’m not an expert, but I’m always willing to help other indie devs 🙂 And do give me feedback about the tutorials, I love hearing from y’all!
Good luck,
Lindsey Reid @so_good_lin

Can I translate this post into Chinese?
LikeLike
And I have a question, the _MaskReplace has a certain bound, if we use _Time.x * _Speed to change UV, we will see the bound across the image clearly, how can we improve that, without make a Seamless texture?
LikeLike
Thanks for your awesome tutorial. But I have a question. There is a hard edge between the sky texture and the bird’s original texture, so how can we blend the two textures smoothly?
LikeLike
I agree! If I did this tutorial over again, I would probably make the mask have a smoother transition on the edges and lerp between the textures based on that value. I would probably make the mask texture black and white to save space, and then you’d only need to look at the r-channel and use that as your lerp factor.
LikeLike
How would you do a similar thing but using World Space coordinates instead of Screen Space?
LikeLike