

Disclaimer: This post is a bit outdated since Unity has introduced the Scriptable Render Pipeline, which Catlike Coding has a better guide on than I’ll ever put in the time to write, LOL. However, if you’re using a legacy version of Unity that doesn’t have the SRP, or you want to write a single custom pipeline effect instead of extending the SRP, then the topics covered in this post are your best bet.
What this tutorial will cover
This is a pretty hefty tutorial that covers how to use command buffers in Unity for graphical effects that require extending the graphics pipeline. I’m going to illustrate the concept of extending the graphics pipeline by explaining how I built the system that creates this selective bloom effect.
The glowing effect in this tutorial is pretty boring, since the glow is a single solid color. I challenge you to modify the glow buffer step to actually render the model or utilize a custom emission map per-object… the possibilities are endless! The possibilities of what could be contained in this tutorial, however, are finite, so that’s why we’re focusing on this solid color glow.
Credit goes to Unity’s example project for command buffers, especially the one on decals, for helping me figure out how to utilize command buffers.
What you need to start
You’ll need some basic knowledge about how Unity’s rendering pipeline works, and what rendering pipelines do in general. I also recommend you check out Unity’s basic overview of command buffers before reading this.
You definitely also need to have some experience writing basic shaders. This blog is full of tutorials on shader writing that I strongly recommend you check out before diving into this one ;0
I also strongly recommend that you reference the Unity project on GitHub for this tutorial, as it completely implements everything we’re about to cover!
Introduction: How To Create a Selective Glow Effect
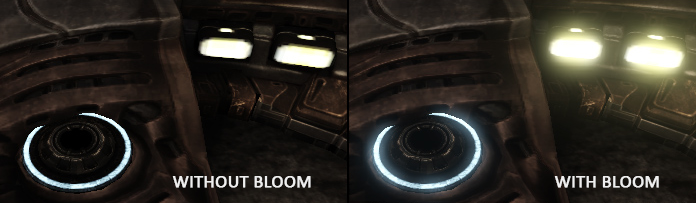
One normally implements bloom as a post-processing effect – as in, it operates on the camera’s finished image- using a blur applied to the whole image. The blurred image is then added back to the original with additive blending, which adds a fuzzy glow to the image.
You can upgrade this algorithm by downsampling (basically, downsizing) the image and only writing pixels to the downsampled image which meet a certain brightness threshold, such as by checking the pixel’s luminosity or alpha channel, as illustrated with this example.
However, there are limitations to checking values in the camera’s rendered image to decide whether or not to blur the pixel. The camera’s texture is an amalgamation of all of the rendering that’s already happened in the pipeline, which means we don’t actually know anything about the object that created the pixel, and the only information we have about the pixel at this point is its (near) finished RGBA value.
What if we wanted to apply the bloom effect selectively- that is, what if we wanted to only add bloom to certain objects? Our problem here is a lack of information- we don’t know enough from the pixel’s RGBA value to know if it’s an object that we want to blur. To get more information about a pixel in the pipleline, we’ll need to encode information about that pixel to a buffer. Buffer is just our fancy way of saying an image that the rendering pipeline can write to and read.
The example linked above actually renders its own HDR color buffer to get information about pixel brightness, but we don’t just want information about brightness.
Therefore, we’ll have to draw any object that we want to glow to a buffer. Our glow effect can then read our glow buffer and only apply the blur to that image, therefore only blurring the pixels from the objects that we want to glow.
Here’s what our rendering steps look like:
- Draw glowing objects to a glow buffer
- Render camera image as normal
- After camera image is rendered, read glow buffer and apply Gaussian blur
- Add blurred glow image back to camera image

Now that we have this general plan down and an understanding of why we need a command buffer, let’s look at how we can actually implement it in Unity!
Part 1: The Glow System
Firstly, we need some kind of structure to determine what objects draw to the glow buffer. This system doesn’t have to involve any pipeline stuff yet.
We’ll need need a class to define the objects that will draw to the glow buffer, and a structure to hold references to all of these objects.
Following the pattern that Unity used in their deferred decals example, I created a CustomGlowSystem to hold references to CustomGlowObjects. The CustomGlowSystem is a singleton, which makes it easy for the rendering system to grab a reference to later on.

The full code for these classes is in a repository here. Let’s pull out and explain the important bits.
Here’s a basic glow object. Note that each object has a glowMaterial property, which you’ll need to set! For the sake of testing this system, I would suggest creating a material with a shader that just outputs a solid color (as you can see, I chose red :P).
using UnityEngine;

[ExecuteInEditMode] // needed for the system to work without running game!!
public class CustomGlowObj : MonoBehaviour
{

   public Material glowMaterial;

   public void OnEnable()
   {
      CustomGlowSystem.instance.Add(this);
   }

   public void Start()
   {
      CustomGlowSystem.instance.Add(this);
   }

   public void OnDisable()
   {
      CustomGlowSystem.instance.Remove(this);
   }
}
Here’s what the glow system looks like. You don’t have to set any properties on it, as the glowing objects automatically add themselves to the system.
using UnityEngine;
using UnityEngine.Rendering;
using System.Collections;
using System.Collections.Generic;

public class CustomGlowSystem
{
   static CustomGlowSystem m_Instance; // singleton
   static public CustomGlowSystem instance {
      get {
         if (m_Instance == null)
            m_Instance = new CustomGlowSystem();
         return m_Instance;
      }
   }

   // list of glow objects
   internal HashSet<CustomGlowObj> m_GlowObjs = newHashSet<CustomGlowObj>();

   public void Add(CustomGlowObj o)
   {
      Remove(o);
      m_GlowObjs.Add(o);
      //Debug.Log("added effect " + o.gameObject.name);
   }

   public void Remove(CustomGlowObj o)
   {
      m_GlowObjs.Remove(o);
      //Debug.Log("removed effect " + o.gameObject.name);
   }
}
You can add the glow system to any non-camera object in the game, and add the glow object class to any item you want to draw to the glow buffer. To test it, just uncomment the debug lines and make sure your objects are adding themselves to the system. You’ll see the debug messages, but nothing interesting is happening in rendering… yet!
(Creating the unique CustomGlowObjects class might be a little bit overkill for the project right now, but it’ll come in handy in the future if you want any tunable properties per object for this effect. :P)
Part 2: Writing to the Command Buffer
Extending the pipeline
We need to add one more structure in C#: the CustomGlowRenderer, which will actually add our new rendering steps and our glow buffer to the rendering pipeline.
You can see the full code for the glow system and glow renderer class here. For the sake of brevity, I’m going to trust that you can figure out what the rest of the code is doing and instead skip to the juicy bit of this class: OnWillRenderObject().
Firstly, we need to create a new CommandBuffer (see Unity documentation here). This buffer is going to contain the render texture for our glow map and the instructions to draw all CustomGlowObjects to the render texture. The commands execute at whatever point in the rendering system we set the command buffer to be. The timing for this command buffer happens to not be super important, but for many effects, it is, so keep that in mind for future projects.
Here’s how we create the command buffer and the render texture for the glow map. Note that when we create the temporary render texture, we pass the values (-1, -1) for the texture size, which means it’ll be the same size as the screen (see documentation on GetTemporaryRT).
// create new command buffer
m_GlowBuffer = new CommandBuffer();
m_GlowBuffer.name ="Glow map buffer";
m_Cameras[cam] = m_GlowBuffer;
// get a reference to the glow system
var glowSystem = CustomGlowSystem.instance;

// create render texture for glow map
int tempID = Shader.PropertyToID("_Temp1");
m_GlowBuffer.GetTemporaryRT(tempID, -1, -1, 24, FilterMode.Bilinear);
// add command to draw stuff to this texture
m_GlowBuffer.SetRenderTarget(tempID);

// clear render texture before drawing to it each frame!!
m_GlowBuffer.ClearRenderTarget(true, true, Color.black);
Next, we need to tell all of the objects from our glow system to draw to our render texture. Make sure you set that glowMaterial property on each glow object! I wrote a shader for it that just draws a solid red color.
// draw all glow objects to the render texture
foreach(CustomGlowObj o in glowSystem.m_GlowObjs)
{
   Renderer r = o.GetComponent<Renderer>();
   Material glowMat = o.glowMaterial;
   if(r && glowMat)
      m_GlowBuffer.DrawRenderer(r, glowMat);
}
Finally, we’re going to release this texture into the wild (not.. like.. release the memory… it’s a joke). Calling SetGlobalTexture will make it possible to access the texture we just drew from any shader, much like how you can always access the camera’s render texture or depth texture. This is going to be important later on when our post-processing effect needs to read our glow buffer! We also add the command buffer to the graphics pipeline at whatever stage we want.
// set render texture as globally accessible 'glow map' texture
m_GlowBuffer.SetGlobalTexture("_GlowMap", tempID);

// add this command buffer to the pipeline
cam.AddCommandBuffer(CameraEvent.BeforeLighting, m_GlowBuffer);
Using Unity’s Frame Debugger
At any point during this tutorial (or your whole life, really), you can check and see what’s going on in your rendering pipeline using the Frame Debugger. You should definitely check out Unity’s documentation on the Frame Debugger if you haven’t used it before 😀
If your code from above is working correctly, you should be able to see your rendering step added to the pipeline. Clicking on it will show you a preview of what your glow buffer is rendering, so you can also use it to check that all of your specified objects are drawing to the glow buffer.
Since the material I set for glowMat just draws a solid red color, our glow texture will have a black background (since the default color value for the temp render texture is black) and will be red wherever it drew a glow object.

If your code is working at this point, you’ve made it through the hardest part!! You officially know how to use command buffers in Unity to add steps to the rendering pipeline 😀
Part 3: Reading the Command Buffer
Now, let’s move on to adding the post-processing step to apply the glow. I probably could make this bit more complicated by writing another command buffer, but instead, why not take a little shortcut?
We can easily apply post-processing effects to the camera by running the camera through a material in OnRenderImage(). This step is applied after all of the other camera rendering happens. Just add this script to your main camera, and make sure you create a material and a new shader that we’ll actually apply our post-processing effect with. To start, just give the shader a _MainTex texture property, and read and output the value of _MainTex in the fragment shader.
using UnityEngine;

[ExecuteInEditMode]
public class PostProcess : MonoBehaviour {

publicMaterial material;
privateCamera cam;

void Start () {
   cam = GetComponent<Camera>();
   cam.depthTextureMode=DepthTextureMode.Depth;
}

void OnRenderImage (RenderTexture source, RenderTexture destination) {
   Graphics.Blit(source, destination, material);
}
}
Finally, we’re done with our C# coding!!! Our system is in place to add all of the necessary rendering steps; now we get to utilize our glow buffer and the camera buffer for our post-processing effect.
Open that shader back up that you used in the material for the post-processing script. To make sure we can access our glow map and the camera’s texture inside our shader, let’s first read both and output them with additive blending.
// make sure you define _MainTex in Properties, but not _GlowMap
// _MainTex will be set to the camera's render texture!
sampler2D _MainTex;
// make sure this has the same name
// as whatever you named it
// when you called SetGlobalTexture!!
sampler2D _GlowMap;

float4 frag(v2f_img input) : COLOR
{
   // sample camera texture
   float4 mainTex = tex2D(_MainTex, input.uv);
   // sample glow texture
   float4 glowTex = tex2D(_GlowMap, input.uv);
   return mainTex + glowTex;
}
If you’ve done everything correctly, your output should now look like this!
Finally, we need to apply the blur to the glow texture so that the glowing actually seeps outside of the bounds of each object. This is why this effect can only be done in post-processing: we need to affect pixels outside of the glowing objects.
I adapted the Gaussian blur algorithm from this tutorial, so I’m not going to re-explain that process here in depth. Basically, we’re going to sample adjacent pixels both in the X and Y direction and add the results, causing the image to become fuzzy. We then add that result back to our camera’s image to get the blurry glow effect!
(There are probably better ways to implement the blurring effect that works better for blurring with a larger radius outside the original object, but let’s go with this for now.)
You’ll need to write a gaussianBlur function, and extend your fragment shader as follows:
float4 frag(v2f_img input) : COLOR
{
   // blur glow map
   float resX = _GlowMap_TexelSize.z;
   float resY = _GlowMap_TexelSize.w;
   float4 blurX = gaussianBlur(_GlowMap, float2(1,0), input.uv, resX);
   float4 blurY = gaussianBlur(_GlowMap, float2(0,1), input.uv, resY);
   float4 glow = blurX + blurY;

   // sample camera texture
   float4 mainTex = tex2D(_MainTex, input.uv);

   return mainTex + glow;
}
With the blurring applied, your selective glow should work!!

Part 4: Fixing Overlap Issue
You probably noticed that this glow effect draws to the glow buffer and applies the glow effect without checking depth values at any point, so our glow effect awkwardly overlaps objects that should be obscuring a glowing object!

There are a couple different ways we could go about solving this, but the simplest solution (that I can think of) is to check the camera’s depth buffer when we draw the glow buffer. We won’t draw any objects to the glow buffer that are obscured in the camera’s depth buffer.
Remember when I told you to write that simple shader that just outputs a solid color? Ya know, the one that draws to the glow buffer? We’re going to modify that shader now to check the camera’s depth buffer before drawing.
Sidenote: if the functions and math below confuse you, I highly recommend downloading Unity’s library of shader helper functions to see exactly what some of these functions are doing, as they’re not all documented. (Look for the download titled ‘built in shaders’).
First of all, we need to get our screen position and depth value in the vertex shader. Unity does all the dumb math for us for the screen position thanks to ComputeScreenPos, but for our depth, we need to multiply our object’s z coordinate in view space by 1/the camera’s far plane.
output.screenPos = ComputeScreenPos(output.pos);
output.linearDepth = -(UnityObjectToViewPos(input.vertex).z
                                            * _ProjectionParams.w);
Note that we calculate BOTH our depth and the camera depth values to linear values, that is, 0..1 values. This is important for comparing them accurately.
Let’s also grab the camera’s depth texture value in the fragment shader.
// decode depth texture info
// normalized screen-space pos
float2 uv = input.screenPos.xy / input.screenPos.w;
float camDepth = SAMPLE_DEPTH_TEXTURE(_CameraDepthTexture, uv);
// converts z buffer value to depth value from 0..1
camDepth = Linear01Depth(camDepth)
Before moving on, let’s write some debug lines to test our camera and local depth values. To use these tests, you’ll also need to set your bloom shader to only output the glow map value.
Uncomment these one at a time to see what the depth values look like. Make sure you adjust your camera’s near and far planes!! I always forget to adjust the far plane, and then everything looks black 😛
//return float4(camDepth, camDepth, camDepth, 1); // test camera depth value
//return float4(input.linearDepth, input.linearDepth, input.linearDepth, 1); // test our depth
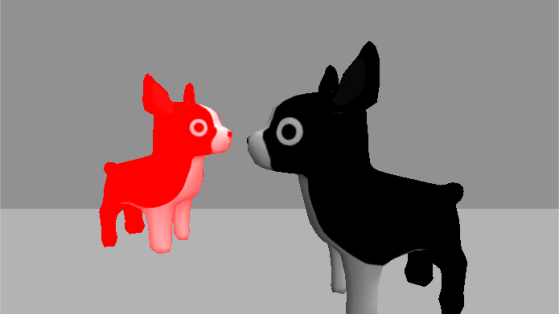
Here’s what my local depth values look like:

And the camera values:

A-ha!!! You can see how our local depth values are different than the camera depth values thanks to the doggos overlapping. This means that we have enough information to tell our shader where not to draw.
I checked where the difference between the camera and local depth values was < 0, and only drew the glow color where that was true.
float4 c = (0, 0, 0, 0);

float diff = saturate(input.linearDepth - camDepth);
if(diff < 0.001)
   c = float4(1, 0, 0, 1);

return c;
With everything working, your glow shader should finally be perfect!!!!

The glow will still bleed on to adjacent objects, since our blurring spreads the effect outside of where the shader above draws. I think this effect is actually quite nice, so I left it in. You might need to find another solution (like reading the depth buffer at the post-processing stage) if you don’t like it, or if your glow effect is going to have a significantly larger radius.
Fin
Whew, you got through this whole tutorial!!! (I’m talking to myself a little here too, as it took me a long time to write…)
I hope you learned something about graphics programming. If you enjoyed this tutorial or have any questions or errors to fix, leave a comment! 😀
Here’s the link to the Unity project on GitHub for this tutorial.
If y’all have any questions about writing shaders in Unity, I’m happy to share as much as I know. I’m not an expert, but I’m always willing to help other indie devs 🙂 And do give me feedback about the tutorials, I love hearing from y’all!
Good luck,
Linden Reid @so_good_lin

Herroo! just discovered this blog thx reddit 😉 And first of all. Thaank you for doing all this awesome tuts!!!
So i have a question, I haven’t really got into shaders yet, but it’s on my to do list. But window shopping through your stuff, I noticed that you have a diffuse shader and a colored outline shader. Also i see you have a cell shaded + outline shader. My question: Since im a fan of the handpainted look. Is it posible to combine the diffuse + colored outline? (and maybe also the rim highlight?).
Also what is your recomendation for handpainted and/or stylized chracters??
LikeLike
Yes, many of the techniques in these tutorials can be combined with other techniques. ;0 You could definitely do a shader with diffuse lighting and an outline pass. I like that idea for stylized hand-painted characters! I can’t tell you what’s best for your aesthetic, though- you’ll just have to experiment and see 😀
LikeLike
Hi!
Unfortunately, I already know the techniques that you are showing here. But I would have loved to have this article before knowing how to do it because this is well detailed and explained!
LikeLike
Shader concept was once alien to me ,especially pp effects now I can understand it is also simple like mechanics ,Thanks for the tutorial.
LikeLike
Yay, I’m glad it helped 😀
LikeLike
This is awesome, thank you for sharing
LikeLike
Hi, thanks for the tutorial!
I wonder, how can set glow effect to the whole terrain? As it doesn’t have Renderer component, so i can’t rerender it.
LikeLike
Thanks for this tutorial. It was a superb starting point to get something else working in a command buffer.
One remark:
Using OnWillRenderObject() is a really nice trick to get things working for all cameras, even the scene view.
The nasty thing is: The commandBuffer will only be added if the object’s mesh with the PostProcess script is within the camera frustum.
I’m aware that the Unity example did the exact same thing… but still you can’t do that in productive code.
What I did:
I added a 2-vertex-mesh to the object with the PostProcess script, spanning around my game world. Due to its bounding box the function would alway be triggered then.
Still a hack…. but works.
Code:
private void AddMesh()
{
// As a trick to make OnWillRenderObject() to be called every frame we add a renderer and a big bounding box around the world. This bounding box will trigger the event for us.
// (We want to use OnWillRenderObject as this has one advantage: It is called once for every camera = Camera.current and so we can make things work for every camera automatically.)
// Two vertex points are sufficient to make Unity create a bounding box.
float extents = WorldSize / 2f;
Mesh mesh = new Mesh();
Vector3[] verts = new Vector3[2];
verts[0] = new Vector3(-extents, 0.0f, -extents);
verts[1] = new Vector3(extents, 1.0f, extents);
mesh.vertices = verts;
mesh.RecalculateBounds();
gameObject.AddComponent();
MeshFilter mf = gameObject.AddComponent();
#if UNITY_EDITOR
// Prevent uncritical editor warning: “SendMessage cannot be called during Awake, CheckConsistency, or OnValidate – UnityEngine.MeshFilter:set_sharedMesh(Mesh)”
UnityEditor.EditorApplication.delayCall += () =>
#endif
{
mf.sharedMesh = mesh;
};
LikeLike
This is an amazing blog.
I keep coming back to this for refuge whenever there are any buffer based work.
Thanks a lot.
LikeLike